Handles Importing:The Ultimate Handles Buying Guide
Are you struggling with client complaints about the quality of your handle?
Are you satisfied with your current handle supplier?
Do you want a reliable handle manufacturer to make your business take off?
If yes, then you’re definitely in the right place.
The ultimate handles buying guide is here for you!
Now, let’s dive right in.


Handles Definition: What Does Handles mean?
A handle is a miniature rounded object, or a lever attached to a door and is used for opening and closing the doors of any kinds. It can also be defined as a part of an object such as a tool, bag, or cup that you use to hold or to be able to pick up and use that object. It can be the part of a utensil, drawer, etc., made to be held in order to move, use, or pick up the things.
Handles come in different styles. They are designed to facilitate the users for daily usage e.g., holding a cup and opening a door etc. They enable us to use the tools to the maximum and facilitate us to have a good grip on different day to day objects
Handles are designed for many reasons. For its use on paneled refrigerators, dishwashers, freezer drawers, trash compactors, and other kitchen purposes which create magnetic grip or a vacuum seal. These pulls are typically large in length and are produced to bring extra material strength and resilience to hold up to numerous uses. They are also famous as “appliance handles”, “refrigerator handles”, or “refrigerator pulls”.
The knob which is a piece of cabinet hardware which is used for opening doors or drawers. There is only one screw installed in it. In disparity to knobs, which has only one screw attached to it a cabinet pull or handle is directly attached to the cabinet Door or drawer in the front by means of more than one screws. Handles have multiple screw holes for better and strong adjustment, however, these also play a very important role when it comes to buying a quality handle. Because there are various screw holes, one of the most influential factors in picking handles is the center-to-center dimension; i.e., This means the difference from the middle of one screw hole to the middle of the next. When there are two screws, this measurement frequently determines the general size of the pull based on its design.
For bigger cabinets, big doors, and large drawers, there is repeatedly a question of what pull size to use. Normally, behind cabinet doors, the hardware is mounted in various ways:
- straddling in the lower inner corner of the door,
- next to the stile or the nearest door;
- mounted vertically at the middle the door’s border, if one exists;
- Or mounted at the very center of the door either vertically or horizontally (this is less common in modern cabinet making).
Seldom, hardware’s are also mounted horizontally at the top or bottom middle of the door. If mounting the hardware at the corner of the door, the installer should merely center the hardware inside the molding on the door or at an aesthetically attractive location to the customer.
Center-mounting is a bit trickier, and can frequently influence the size of the pull. When choosing the handle for a drawer the general often the useful rule of thumb states that the length of the hardware should be among 1/4 and 3/8 of the width of the drawer front, with 1/3 being a central ground.
There is no wrong size when it comes to choosing handles. It is a personal decision and you can choose what is best for you or your customers. Taking a numeric approach for a better understanding of the length let’s consider this example, following the general rule of thumb on a 24-inch drawer front, you can select a pull between 6 and 9 inches in length. Because pulls larger than 9 inches are generally designed for appliances and refrigerators, a good option might be the B1-5 series, which overall measures 6.625 inches. However, if you are looking for a more modern look, you can ignore the rule of thumb and go with a pull that stretches up to most of the length of the drawer, such as the T366-480-BNA, a large stainless steel drawer handles measuring up to 19.625 inches.
Why You Need Handles?
The answer is simple. It just makes our life a whole lot easier. Function and beauty may also be a good reason to love knobs. For instance, we are all aware how much messy it can get in the kitchen, imagine having to open the cabinets with greasy hands and messing everything around, imagine having to clean it afterward …hectic for sure! That is why having Knobs and pulls helps to protect your cabinets because you are not shifting the oils on your fingers to the cupboard fronts. Handles are our everyday time savers even though we always take it for granted.
- A sheath or coating on the handle that offers friction against the hand, plummeting the gripping force needed to attain a reliable grip.
- They are necessary to keep everything ship-shape and in place.
- You can effortlessly access what you need by just opening your kitchen cupboards with handles
- Save time and space by entitling a place for the lot in your kitchen drawers.
- They are a lovely way to organize and show off your collection.
- You also need them to open your doors and drawers if you have a frameless or full-overlay cabinet since your fingers won’t fit in the reveals of the cabinet for operation.
Handles are used everywhere. From opening drawers to opening doors since you don’t want to do the trouble of fitting your fingers in reveals of the cabinet operation to open them especially if you have a frameless or full-overlay cabinet. Handles are not only easy for use, but they also make the overall design of your kitchen very classy.
When you are redesigning your space or building a new one should always choose handle hardware’s the last. You can match them with the rest of the décor later
How to Install Handles?
When you are buying new cabinet doors or drawer fronts know that they don’t include handles so that owners can choose such details (such as design or style) based on their decor preferences. The procedure of adding handles to the cabinets isn’t a difficult one if you have the right tools. The fittings and installation of handles or pull depends on the right drill bit, which is typically 3/16 inch.
Mounting cabinet hardware is one of the most filling kitchens or bathroom rehab ventures you can take on. By adding just a few new knobs or pulls to your cabinet fronts, you instantly upgrade your kitchen within the span a couple of hours.
However, there is one thing to beware of, that is mounting handles is a job that can’t afford any mistakes. Drilling should be exactly where you want it to be. Drill one in the wrong spot and you have ruined the whole cabinet or door. You will have to buy a new one unless you are okay with holes in the door or closet fronts.
You will need:
- Cordless drill
- Tape measure
- Laser level or chalk snap line
- Painter’s tape
- Drill bits
- Cabinet hardware
Most of the handles are packaged with #8 machine screws, which are 0.16 inch, or roughly 5/32 inch, in width. Use a 3/16-inch bit to drill the hole in the cabinets. The bolt should fit in the hole without binding. If you notice that the screw is too tight, use a drill bit a little larger by 1/16 inch till the screw slides in the hole with a little or no struggle. If you have several holes to drill, construct a small template out of wood or cardboard to designate hole positions on the drawer or door front.
When installing door knobs, the length of the screw is often overlooked. Producers typically provide screws with a suitable length of 3/4-inch-thick material. If your cabinets have additional layers or use the puny material, the given screw length may not be fitting. The general rule of thumb indicates that the screw length should be 1/4 inch longer than the breadth of your cabinet door material.
Find Your Horizontals or Verticals
- Choose a drill bit by putting bits of increasing size into the hole on the breakfront hardware. pick the bit that most closely fits into that hole.
- If you have a long stretch of doors or drawers, spot the holes on the extreme points first (left to right, or top to bottom). Between the two extreme points draw a line.
- For the row, get the vertical measurement, split it equally, then mark that spot. On each extreme end do this twice.
- For a column, take the horizontal measurement, split it 50/50, then mark that spot. Do this twice, one on each end.
- As a substitute for using a chalk snap line, you can also use a laser level. Run the laser line on the face of all doors or drawers, thus getting the vertical measurement.
Find Your Center
Either you are using a single-screw type hardware or double-screw type, you need to find the one center spot of every drawer, cabinet or door. However, with cabinet doors, you will not be placing the hardware in the middle of the door. A lower corner is a more likely considered.
Apply Masking Tape to Prevent Damage
Paste a small masking tape over the area which you think will be the center. The tape will stop the drill bit from “walking,” and thus spoil the cabinet face. However, if you are super confident about your drilling skills, you might as well just drop the masking tape idea.
Step 1. Measure the height of the door handle
There are numerous ways to measure the height of your door handle. You try by measuring the height of other door handles in your house as a sample. Alternatively, you can also follow the instruction manual attached to the door handles and use that length. Or you can use the typical handle height which is 1050mm off the floor.
After you have decided the height of the door handle mark it on the side of the door. Place a door wedge under the door to stop it from moving or vibrating when you are installing the door handle. Keep on positioning the wedge as you change the sides for your comfort.
Step 2. Mark where the door handle will go
To avoid any expensive drilling mistakes. Use the template given in the door handle kit to mark the spot where you will be drilling. Align the template with the mark you’ve made for the elevation of the door handle. Smear on the template where you will drill holes in the side and front of the door. Repeat this process for the other side of the door.
Step 3. Drill pilot holes in the door
Using the template, use a 2mm drill bit to drill trial holes in the door where you have marked on the front, back and side of the door. Before drilling, make sure you are right-angled to the door. Don’t drill right through the door as this might cause the wood on the opposite side to splinter.
Tips:
- If you make a hole in slightly the incorrect spot (1/16″ or so), it is possible to twist the drill bit about (or use a larger bit) to expand the hole. This will permit you to position the hardware to some extent different spot when you bolt it down.
- If you penetrated in a completely wrong spot, drill another hole. With affluent solid wood cabinetry, this is made possible because the better wood permits you to drill two holes close together. However, when dealing with less expensive particleboard, the board may break if you try drilling two holes close together.
Step 4. Drill into the pilot holes
It is important to read the instructions on every door handle kit and there might be variations among handles. After drilling the preliminary holes, put a larger drill bit in the battery-operated drill. Use this drill to make all the model holes on the front, back, and side of the door. Make sure you don’t let the drill bit pass the other side of the door because it might make
the wood splinters.
Step 5. Drill a hole for the spindle
Attach 25mm spade bit to your mobile drill. Make sure the door is accurately jammed and won’t move, drill the spade bit into the middle hole of the front of the door. Replicate this drilling procedure on the other side of the door. The spindle for the door handles will be inserted in these holes.
Step 6. Drill a hole for the barrel
Make a hole in the side of the door using a cordless drill. Insert the barrel in this place. Before you start drilling make sure you are right-angled to the side of the drill, so you avoid any drilling mistakes.
Step 7. Mark around the faceplate
Insert the latch on the side of the door where you have drilled. By using a pencil draw around the faceplate. Remove the faceplate and latch from the door. Use a sharp knife to cut around the line of the faceplate.
Step 8. Chisel out a hole for the latch
Use the sharp knife and the hammer to shape out a hole for the bolt. Use the cuts made by the knife as your guidelines as to when to stop chiseling. Also, carve inside the hole for the handle to fit. Insert the handle on the side of the door and see if its faceplate sits even to the door. If it doesn’t, mold some more until it does sit even.
Step 9. Attach the handle to the door
Insert the handle into the side of the door. Drill pilot holes with a 2mm drill bit. Drill them where the screws will attach to the door. Use the battery-operated drill to drill in the two screws at the top and bottom of the handle.
Step 10. Install the striker plate
On the middle barrel install a striker plate almost close to the door and mark on the door frame. To keep it at the center of the handle keep the striker plate against the door frame. Spot the top and bottom of the striker plate on the door border.
Step 11. Drill a hole for the striker plate
On the inside of the door border, drill a preliminary hole, using the mark in the middle of the barrel. Then attach the 25mm drill bit to the cordless drill and drill into the preliminary hole.
Step 12. Draw around the striker plate
Clutch the striker plate up compared to the hole you drilled inclusive of the doorframe. Mark, it up with the top and bottom lines you sketched on the side of the door frame. Draw around the striker plate by using the pencil. Cut around the guidelines of the striker plate with the help of a knife.
Step 13. Shape the recess for the striker plate
After cutting around the guidelines of the striker plate, use the high-pitched chisel and the mallet to chisel out a recess for the striker plate. The cuts are the guidelines made to tell when to stop cutting. Insert the demonstrator plate into the recess to make sure it sits even. If it doesn’t, cut out some more wood.
Step 14. Attaching the handles
Now, remove the faceplates from the two pulls. Insert the two screws into the minor holes in the door and install the bolt into the larger hole. Ensure that the handles are in downward motion when putting a faceplate on one of the knobs. Add a screw into one of the holes in the faceplate and adjust the handle over the barrel, while doing that make sure the screw, goes into the grub screw. Next, tighten the screw. Repeat this procedure for the other handle. Tense the grub screws on both handles. Constrict the screws at the top and bottom of the knob to lock it to the door.
Step 16. Attach the faceplates
Snap the Door handle in place by putting faceplate over it. To secure and lock the faceplate, use the Allen key given in the door handle kit. Replicate this process for attaching another faceplate. When done, check to see if the door is opening or closing properly.
2 Main Types of Handles
Cabinet hardware comes in a variability of shapes, sizes, and styles. However, they can be broken down into several categories e.g. cabinet knobs, cabinet pulls (also called cabinet handles), and cabinet bolts.
Knobs are the most basic and simplest type to install. Usually, a knob is attached to the cabinet door or drawer front with the help of just one screw. Knobs/handles can be produced in a variety of materials. Industrial metal materials can include brass, particularly solid brass knobs; zinc knobs, occasionally also known as die cast, are also common. Stainless steel knobs which are often found in the kitchen, and metals such as bronze in our Sedona Suite of rustic cabinet hardware, are some of the examples of the diverse range of metal material for knobs.
Chapter4.1: Furniture Handles
Door handle may seem insignificant compared to the rest of your house décor. However, choosing the right kind of door handle does play a huge role in complementing and overall perfect décor. It shouldn’t just be beautiful but should also be accessible to users. They also need to be proficient in serving the purpose of the passage, privacy or dummy range.
Cabinet pulls, cabinet handles, dresser handles, cupboard Handles and drawer handles are the different types of furniture handles. It has an endless variety of style and material. This type of update to your kitchen hardware is definitely quick, less expensive and can easily be done by you.
Chapter4.1.1: Modern Handles
Modern handles can be a perfect choice for your modern doors. They are chic, classy and needs minimum skills to be installed. This type of handle gives your space the kind of luxury feel it earns.
Contemporary Handles comprises Handles for kitchen, bathroom, living room, home office and dining room furniture. It also consists of all another type of handles such as pull handles, oval plate handles, fretted plate handles, engraved plate handles, ring handles, drop handles, cabinet handles, tray handles, wardrobe handles, pedestal handles, chest handles, coffin handles.
Chapter4.1.2: Antique Handles
Antique holders are designed to fit mortice locks, latches and surface mounted rim locks or latches. Antique handles come in the best collection. Its design includes true Georgian and Victorian door knobs which play a most important part in the finishing part of most refurbishment projects. Many of them are produced from solid brass, nickel, satin nickel, glass, forged steel and wooden knobs and wrenches.
In the 17th century when handles were recognized as a decorative element on furniture’s, antique handles were the first to be created. It wouldn’t be wrong to say that antique handles are the most primitive form of handles and they are still loved.
If you have designed your kitchen as more traditional then adding antique handles is a great way to compliment and complete your design. Many stores offer handles with an Antique style or looks which saves you from having to look for them in estate sales or flea markets.
One can learn so much of the date of the handle by looking at the material or the way it’s shaped. Back in 1690, the brass produced had a very rough and unappealing look. To make the metal feel softer lead was added to the mixture of copper and calamine. It’s less gleaming and more yellow than brass produced after around 1770. In the same year, James Emerson patented an amalgam of copper and pure zinc, which, because of its closer likeness to gold and the deficiency of pitting, soon developed into the standard form of brass.
The first metal handles used in the primary and mid-17th century were made of iron and were shaped like reversed hearts. These were still widely being used in country furniture in the 18th century, but on quality, pieces were replaced by drops, typically teardrop-shaped swellings of solid brass that were hinged to a back plate at their thin end.
Chapter4.1.3: Cabinet Handles
Cabinet, Knobs, and Pulls are simple add-ons that offer an easy way to appraise the look of a kitchen, bathroom, or furniture portion. These hardware elements come in a wide range of styles, colors, and textures, so there are great selections to complement any home.
Cabinet hardware and handles are like jewelry for your home décor. Just like how you coordinate your wardrobe selecting the right type of hardware is equally important. Before buying one, do a thorough research, you can try by ordering sample handles and try matching them with your furniture, check other finishing and get the perfect fit
There is no hard and fast rule of whether to choose a handle or a pull. However, the general application suggests that people usually use knobs for doors and pulls for drawers. There are no strict rules to follow when choosing whether to select a knob or a pull or both.
Drawers can get very heavy with all the stuff in them. Hence, using a pull can make it very comfortable to open them. This gives us a complete grip on our hand then using just the fingertips.
You can also stick to just one instead of using both. Use of knobs is apparent in many older kitchens before the variety of options. However, for a more contemporary look, pulls are often used. There is also traditional style pulls available to complement your traditional design.
Take note of your design elements such as cabinet style, countertop edge, lighting fittings etc. Try samples and check if they complement the feel of your kitchen or house overall.
Chapter4.1.4: Cupboard Handles
We always make perception on the first look. We always notice the outside look of designs of different houses, kitchens, and cabinets etc. However, convenience and suitability are important just as the overall appearance. Appearance and convenience are two vital factors to consider when selecting or building cupboard handles. Your own needs are important and can be helpful to decide on the right type of handle or pull. Easy to clean handles are certainly more suitable and convenient to use.
Chapter4.1.5: Kitchen Handles
Kitchen handles add the final touch to your kitchen cabinetry design. It finishes off the complete look, as well as helps carry the “style” you want to accomplish. Every now and then all it takes is a modification in hardware to totally transform the look of a space.
There are several different types of hardware offered in a variety of qualities. There are your typical knobs and pulls, as well as cup pulls, which are common when paired with Shaker cabinets, and lustrous “European” style cabinet bar pulls, which help bring a dosage of modernity to space.
Knobs and pulls also have a textured design to them. For finishes, brushed nickel inclines to be the most common because it makes a kitchen or bath seem more contemporary and coordinates well with stainless steel appliances.
Chapter4.1.6: Dresser Handles
The axes for the doors are a very significant part of the design as they are used for the opening and closing of the doors. Cruxes are almost always hidden, which delivers a cleaner look to the cabinets. Soft close hinges are offered now, which slows down the cabinet door, so it doesn’t bang. Soft close hinges not only cut down the noise of closing the cabinets but also lessen the wear and tear of cabinets.
Chapter4.1.7: Wardrobe Handles
Wardrobe Knobs are used to open Wardrobe cabinets and bins without having to lose control of the unit. A wardrobe knob should be durable enough to let a person open a unit without letting the bin or wardrobe flop. Installation of the wardrobe Handle is very easy and not that complex. An owner may be able to fit wardrobe Handle without any outside help.
When selecting the right wardrobe knob for the room of the home, there are different factors to consider. First, one must consider the final look of the room. You may want to pick a wardrobe handle that matches the theme of your room. You can choose an antique handle if you are going for a vintage look for your room.
Chapter4.1.8: Drawer Handles
Throughout its life, a drawer handle is closed and open about 7-10 times or to be more specific 3500 times a year. Choosing a drawer handle that can take such slamming is important, it should be durable and long-lasting.
The slides you pick for your drawers are another significant choice. The cheapest choice is an all plastic glide, which isn’t structurally the best as it can’t sustain heavier loads. An all metal slide can take more weight and is tougher.
There are the type of glides which partially pull out the drawer upon opening it while other slides down the whole drawer. The soft-close function is just like doors is also available in drawer glides.
Occasionally, you will see a single cup handle straddling in the focus of a drawer, even in a wide one. However, some producers will mount two pulls on the left and right side to add a visual appeal to the overall design.
The only warning note: While opening a drawer, you must pull both knobs. Pulling only one will make your drawer off-balance and this can damage the glides and wood of the drawer. This applies to all type of drawers
Chapter4.2: Industrial Handles
Choosing the correct door knob and lock set for your industry is a verdict you must reach when swapping, installing new or upgrading your door hardware.
There are many choices to evaluate. You must decide the type of door knob you want and the type of lock system that is appropriate to your needs. The type of lock you choose will solely be based on the security function that you require from the door hardware.
You might expect the doorknob to be round or square but does not have to be a knob at all. It can be a “lever handle” or a “handle set” which is a blend thumb latch / handle used on external entry doors. Lever handles are easier to clutch than doorknobs and are an accepted functional device meeting handicap ADA Barrier Free / Handy Design necessity. Doorknobs, on the other hand, are not approved for this use as they involve tight grasping, pinching or twisting of the wrist to open. ADA obedience is obligatory in commercial construction.
It is worthwhile to notice a number of ways a door handle can attach to the lock set. On older style doors, the door handle is linked with the help of bare set-screw that secures the handle to a square threaded rod. When twisted, the square rod gets rotated and operate the handle mechanism. The problem with this style (besides the unsightly set-screw) is that the set-screw style doorknob frequently gets loose and may end up revolving in your hand.
Currently, the method for attaching doorknob to the lock set is to use no screw at all, rather a hidden device known as a detent. This type of “no-screw” doorknob can easily be removed using a special technique.
Chapter4.2.1: Industrial Cabinet Handles
Industrial cabinet handles which also includes depressed pulls and trunk handles are produced in non-corrosive material for heavy-duty use. Industrial cabinet knobs or door handles are appropriate for industrial, electronic, medical, military, and cleaning room usage with selections such as NSF certified and RoHS compliant products.
They are mixed with stainless steel along with innovative designs to create a strong quality handles that augment the feel of products while giving durability in severe environments. Mirror and satin finish choices emphasize accuracy quality when used in limitless applications.
Chapter4.2.1: Industrial Cupboard Handles
Chapter4.2.1: Industrial Drawer Handles
The rocky knobs symbolize industrial design. Produced from cast iron, they’re rugged and have an elegantly distressed surface – perfect for an industrial feel. These robust drawer handles look amazing on domestic or salvaged wooden stuff to create a vintage-industrial visual.
Cup handles are a special form of cabinet pull that is made particularly for use on drawers. They are frequently known as ‘bin pulls’ because of this usage, or as ‘half-moon pulls’ since they are semi-circular or semi-elliptical in shape.
The mounting method and the shape of the mounting are what makes cup pull especially attractive. Owing to their unique design, bin pulls can be opened from one direction only (the open side of the pull, typically the underside), relatively from the top and the bottom like a typical handle.
Usually, bin pulls are fitted with the open end facing down. Hence, after installation, you may pull open the drawer from under the pull, which may be changed for some folks who are habitual of grabbing their handles from the top.
The cup handles bids a unique look and a feel which is a welcoming change for your eyes when compared with traditional pulls. The mounting is another element which makes numerous cup handles exclusively. Most cup pulls do not have the screw holes where you might imagine.
4 Main Material Types of Handles
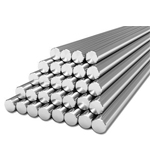
There are several available materials that one can choose from when buying handles. Each Type of material provides different benefits with it. Factory-made metal materials include brass, particularly solid brass knobs; zinc knobs, which is sometimes also called die cast, are also typical forms. Stainless steel knobs often found in the kitchen, and metals such as bronze in our Sedona Suite of rustic cabinet hardware, are just some names in the long list if metals for handles.
Besides metal, other materials can also be used in the manufacturing of handles. The other such material includes marble knobs, mined from huge mines around the world; and ordinary stone knobs.
Chapter5.1: Zinc Alloy Handles
These metals are made of zinc alloy. These hinges are produced from the top quality raw material. Zinc alloys are extensively used in furniture manufacturing industry.
Zinc is one of the strongest and most affordable used in the manufacturing of handles. Zinc is also environmentally friendly and is a non-toxic material. Zinc is recyclable which makes it easy to be recycled once ridden off. It has a low melting point which makes it easy to convert to zinc alloys.
One side effect of using zinc is that it is highly corrosive. However, proper lacquering and coating can protect zinc from oxidizing effect. It is flexible (low melting point) and can be shaped more easily. However, the quality of zinc handles is not that durable. They can easily break because of its inability to hold up the pressure and is not stretchable.
Chapter5.2: Aluminum Alloy Handles
Homeowners who look for a stainless steel look frequently opt for aluminum. Aluminum is very cost effective and handles of aluminum alloy are very light in weight. Aluminum alloy handles are very simple in design and are easy to be installed in the cabinet doors.
Aluminum surface is soft making it easy to cut and shape. Aluminum is oxidation and corrosion resistance mostly due to its passivation layer. When aluminum is oxidized, its surface turns white and will occasionally pit. In some risky acidic or base environments, Aluminum may rust quickly with catastrophic results.
Aluminum door handles produced from finest aluminum alloys; oxidation resilient; oxidation surface layer protects against external effects; easy to preserve due to the oxidation protection layer; and simple dusting with a soft moist cloth.
Chapter5.3: Steel Handles
Just like aluminum alloy handles, steel levers also tend to be very low-priced. They are a great choice for the homeowner who wants longevity in their cabinet handles. There is less wear and tear with steel handles.
Chapter5.4: Stainless Steel Handles
Real stainless-steel handles are usually made from a metal alloy that doesn’t have a coating. Its configuration does comprise chromium and/or nickel to make it sturdy. Quality stainless steel knob is corrosion-, tarnish-, and scratch-resistant. Stainless-steel isn’t as soft and supple as brass so handles made from stainless steel is naturally more modern.
Stainless-steel door handles are produced from a steel alloy comprising an erratic percentage of chromium contingent on the grade. The benefit of stainless steel door handles is that there are several grades, and the higher the grade stainless-steel used in production the more resistant the handles become to atmospheric conditions. This isn’t usually of worry when installing internal door handles, where grade 304 is most normally used, but if they are for external use, in seaside properties, swimming pools or sea projects then a grade 316 is classically recommended due to its bigger resistance to corrosion.
Another advantage that stainless steel door handles have is that some mockups are fire rated, meaning they have been verified and can endure a duration of time under average fire conditions, which is vital for property developers where building guidelines may require that fire rated door holders are used.
Stainless-steel offers many benefits to the architectural/decorative metal user. The main advantages comprise of high corrosion resistance letting it be used in severe environments. It is resistance to fire and heat permitting it to resist scaling and strengthen at high temperatures.
Hygienic, non-porous surface joined with the easy cleaning facility of stainless makes it the prime choice for applications which need strict hygiene control in hospitals, kitchens, and other food processing plants. Visual appearance provides a modern and attractive appearance for most architectural metal usage.
To achieve all-out corrosion resistance and artistic appeal, the exterior of the stainless steel must be clean. If the grade of stainless steel and the exterior finish are properly selected, and cleaning plans carried out on a consistent basis, good performance and longevity will result.
Stainless-steel is very convenient to clean. Washing with soap or mild cleansing agent and warm water followed by a clear water rinsing is adequate for domestic and architectural gear. When stainless-steel is kept dirty signs of surface discoloration appears.
10 Main Shaped Types of Handles
It is important to decide on the shape of the handle before buying them. It is important to ensure that they are comfortable to use and does not create any annoyance. The best option is to try testing the handles before buying them. There might be a small edge that might make using it difficult on daily basis.
Some cabinet handles come with a very stylish and refined surface while there are others who may have edges in their design that makes them difficult to use. The texture of the cabinet should be easy to use. Handles come in a variety of shapes and give a great look to your house, for instance, you can get palm tree handles for your beach home or apple shaped handles for the kitchen.
Before buying handles make sure you have done in-depth research on your requirements or design. Handles are made from expensive materials like pewter, or inexpensive cabinet handles that are produced from stainless-steel. Focusing on the final look can ease your decision-making process.
Handles come in wide array of styles from traditional handles, transitional handles to contemporary handles, rustic handles… and the list goes on.
Because of their different shapes and sizes, handles can be used for different purposes. For instance, small handles such as the 97015 series and the 100-20 series are seamless for small applications such as pull-out breadboards and butcher wedges. Oblong-shaped handles such as the elliptical 105 series and B721 series and the quadrilateral 149 series are brilliant choices for doors with thin moldings, or for long, thin doors. If you are searching to cover up marks on a cabinet left by another handle, knob with a wide base or linked backplate, such as the 158 series or the 161 series, will be an appropriate option.
There is a type of cabinet handle which is designed especially for refrigerators, freezers, dishwashers, and other things with wood-panel layovers often called panel kits. Since they are designed for specific purpose these handles are tested to check if they can withstand heavy usage and suction power of refrigerator and dishwasher on daily basis.
Difference between appliance handles and cabinet pulls is typically determined by size. Apart from length, appliance pulls are usually much wider and thicker than cabinet pulls to give additional strength. For instance, the T305 series stainless-steel bar pulls measure ⅜ inch in width. The correspondingly designed D85 series bar-style appliance pulls portion 1 inch in diameter – nearly three times the chunkiness.
Chapter6.1: U/D Shaped Handles
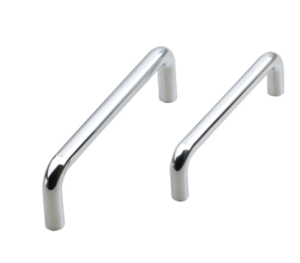
D Handles is one of the most adaptable styles of handle. They come in a wide range of styles and sizes and compliment both home design or office design. Offered from only 64mm hole centers to 448mm hole centers. this a D handle can fit in any unit door or drawer.
The soft stainless-steel and refined chrome D handle are a widespread buy for kitchen cabinets and at the office. Matt nickel is great for the variability of styles available. The color ranges such as the black and white D handle is a perfect match for the traditional and modern home.
Chapter6.2: Bow Shaped Handles

Bow handles are offered in a huge assortment of styles and sizes, from the minutest hole center at 96mm to 352mm hole centers. They are among the most competitively priced handle and are just as famous as the D handles.
They are a pleasant addition to your office desk drawer, your bathroom cabinet or kitchen cupboards. Bow handle that will fit any state. All finishes are available such as polished chrome, matt chrome, and matt nickel, the styles diverge from round, flat and dented effect handles with matching knobs with many of them to compliment your décor.
Chapter6.3: Bridge Shaped Handles
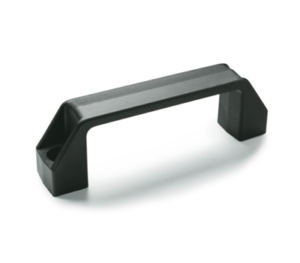
The bridge-shaped knob is extensively used for all types of furniture hardware, such as a door, cabinet, drawer, cupboard, etc.
Chapter6.4: T Bar Handles
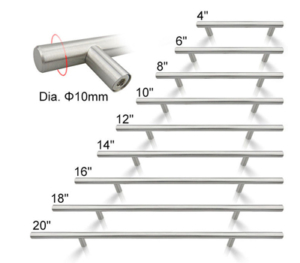
Here we have T handles which are a knob in the form of the letter T. A collection that ranges from 38mm in length to 93mm and comes in wide variety of finishes to suit your demand. The stainless-steel and polished chrome square T handles are of a fashionable styling, while the antique pewter and antique brass twister t handles are of traditional style. There are a diversity of handles that will balance each other or even on their own.
Chapter6.5: Recessed Handles
Chapter6.6: Ring Handles
Ring handles rotate side-to-side around a hinge with a rod, and are mainly used in place of door knobs or lever door handles to trigger locks on heavy entry doors. The ring itself also naturally pivots up and down towards the person twisting it. Ring handles can be joined with most knobs and handle on the other side of the door. Ring handles can be used with gate bolts that have a rod to activate the latch from the other side of the gate and are mostly of similar design.
Since they have a large size, most ring handles need locks with a wide backseat. The aperture, in most cases, is separate: it is located in between the ring handle and the edge of the door, or under the ring handle, and is safeguarded by (trimmed with) a keyhole escutcheon. Well-suited locks and keyhole escutcheons are itemized with each pattern.
Ring handles fitted as non-functioning pulls in the middle of a door or pair of doors ease the opening and closing and offer distinctive ornamentation. In this part, the sideways rotation can be removed. The up-and-down movement of the ring is well-preserved.
Ring handles switch freely (are not spring-loaded) and is sold separately (each). Each ring handle is delivered with mounting screws and a 3-inch-long (76mm) rod for use with doors/gates up to 1-3/4 inches (44mm) dense. A longer spindle bought separately, will be needed for a heavier door/gate. Please specify door/gate thickness when ordering one.
Chapter6.7: Chest Handles
Chapter6.8: Finger Handles

Chapter6.9: Drop Handles
Drop handles are an old type of ironmongery that is mostly used on drawers for writing bureau’s, chest of drawers and office furniture.
Drop levers can be used in the kitchen, bedroom or in the office at home or work. All drop handles are available in numerous styles and sizes with a range of diverse finishes to suit most demands.
Chapter6.10: Folding Handles
Production Process of Handles
Different in aesthetics and ergonomics handles ascribe to applications to help users physically exert force and maximize tool effectiveness. Levers, while ranging in size, shape, and construction material, should fit three basic standards: they need to be sturdy enough to sustain to object, long enough to offer adequate leverage and have a small fringe to enable a solid manual hold.
Chapter7.1: Design

Before the handle makes its shape, let’s start with raw bars of solid brass. Brass is a highly reliable and durable metal that resists corrosion. carrying a piece of solid brass hardware in your hand, you will instantly notice the change – it is heavier, stronger, and flatter than handle that is made of aluminum or plated steel.
The following are questions to ask when creating a design for two- or three-dimensional purpose. Not all are applicable to all designs. The most significant consideration from the start of the design process is the final outcome of the design, the end-user, and their interface with one another.
- Aesthetics:
Is it fitting, arresting, beautiful, unruffled, critically evaluated, well defined, stylistically advanced, in a genre, historically, culturally, and temporally related, effective, well laid out, useful, visually alluring?
- Accessibility:
Is the result approachable and usable by the maximum number of people?
- Availability:
Is it convenient, easily available, and fully functioning?
- Cost:
What is the true cost of manufacturing, warehousing, circulation, upkeep, upgrades, and dumping or reuse?
- Disposal:
How would the designed result end its functional life?
- Durability:
Will the final product hold up as it’s designed to?
- Function:
Is its operation clear, and does it work well?
- Influence:
Will the resulting product add to the course of design thinking?
- Materials:
Are they ideal for the outcome’s purpose in terms of cost, toughness, look, feel, and reuse or disposal?
- Maintenance:
Can it be effortlessly cleaned, repaired, stored, and upgraded?
- Practicality:
Is it practical, utilitarian, and beneficial?
- Reliability:
Can the final product function, longevity, and safety be relied upon?
- Reuse:
Are the gears and materials cyclable?
- Sustainability:
Is the outcome’s production, materials, use, and reuse as “green” and non-invasive as possible?
- Transparency:
Are the shape and function of the design result and its parts logical, clear, and easy to understand?
- Universality:
Will the outcome be practical by individuals with the widest range of mental and physical capabilities?
- Usefulness:
Do we need it?
There is no accurate timeline, system, or staged operation that is true for every design procedure. However, the following is a general guide that can be us for use in any design development.
It has been summarized from numerous sources. These points are listed in more-or-less sequential order but need not essentially be followed that way, or in a direct fashion. Steps may need to be intertwined or overlapped with any project. Communication, sketches, prototypes, and tests, for the specimen, are tools to be used, especially in the spirit of collaboration.
- Start.
- Ask questions.
- Plan.
- Implement the plan.
- Curate.
Chapter7.2: Mold Manufacturing
Expert artisans convert raw material to beautiful handle using an age-old and time-tested practice known as heat forging – pounding hot metal into a specially made for purpose die. Another simpler technique against forging is casting, heat forging needs more exhaustive work and careful attention to detail, but it harvests stronger heavier products.
Although there are numerous other methods used for metal handles, including casting where a molten metal is turned into a mold, brass doorknobs are usually forged. Forging is a procedure in which heated metal is transformed into shaped dyes under very high pressure. Forging can produce products with greater strength, toughness, dependability, and quality (up to 250% stronger than casting). Forging is also more effective and economical.
Forging:
- The billet should be first heated to 1,400° F (759.9° C) in a gas-fired boiler to soften the metal. The billet is then positioned in a specially designed set of steel dyes that are shaped to adapt to the profile of the merchandise being made. A press put on high pressure to force the fiery billet into the die cavity, where the billet takes the form of the doorknob.
- After the handle is evicted from the press, it is cooled, clipped to size, tempered, and cleaned to eliminate heat scale produced during the process.
Chapter7.3: Die Casting
When the metal gets hot enough, it’s dispensed with a mold or die that’s shaped like the opposite of what you’re trying to make. For instance, if you want to make a square, you’d have a square-shaped hole impressed out of a block of steel (the die). This makes the method we know as “die casting”. Oftentimes, you will hear cabinet hardware mentioned to as “die-cast”, but this is talking about the industrial process and not the material.
The issue with casting is that the metal is liquid when it’s dispensed into the mold. Liquids are prone to get bubbles in them. When you get that metal from the heat, it starts cooling. And if it cools down with a bubble in it, then that bubble might be in your casting – This case means, an air bubble inside your doorknob or pull. If those froths are close to the surface of the knob, after some usage (or even during the final process), the bubbles will break, triggering pits in the surface of the knob.
Chapter7.4: Drilling
There is a wrong way and a correct way to drill for door handles. Mistakes can prove to be costly by making you buy a whole new door or cabinet if you drill a wrong hole. Using the correct technique for drilling a cabinet door will need purchasing of a template to use as a guide.
Before finishing a handle, a trim is required. Expert operators work the imprinting press that cuts the extra metal left by the forge. After this another apparatus grinds the surface to remove oxidation formed from the forge, exposing the smooth metal.
Chapter7.5: Polishing

This step has two phases – the first requires thorough removal of any imperfections such as cuts, or nicks and the second phase is to buff the hardware to a perfect shine. In the first stage, fast revolving wheels wipe away possible scratches left by the forge. Then jeweler’s blusher is used to prudently buff the metal.
For more protection, a carbon-based(organic) or inorganic coating is used through numerous different processes. Organic coatings comprise polyurethanes, acrylics, and epoxies. Since the diluters used in organic coatings can create dangerous materials and superiority problems, manufacturers are referring to inorganic coatings based on passive metals. These are used in electroplating or physical vapor deposition (PVD).
PVD places a coating formed by crackling and thermal evaporators in an airtight compartment. The chamber is emptied to high vacuum pressures (less than one-millionth of an atmospheric pressure) by a succession of pumps. A thin coating is dropped one molecule at a time. For fruitful PVD, the brass surface must first be thoroughly cleaned in many washing and tossing tanks, trailed by electroplating with semiprecious materials.
Chapter7.6: Surface Treatment

handles go through several finishing steps. Isolated coining, milling, drilling, and tapping methods to produce a surface ready for the refining operation. A typical doorknob is 2.25 in (5.715 cm) in diameter. The elementary components are the handle rose, shank, spindle, and knob-top. The knob-top is the upper and bigger part that is gripped by the hand. The stem is the bulging stem of a handle and comprises a hole or socket to take the spindle. The knob rose is a round plate that formulates into a knob socket and is used for attachment to the surface of a door. The handle is attached to the shaft, a metal shaft that turns the bolt of the lock. One or more polishing steps are used to achieve a brilliant finish.
Handle finishing requires various processes and techniques with a wide range of enhanced properties. Companies working in handle finishing may specialize in just one of these methods or may be furnished to carry out most, or all.
The foremost goal of handle finishing is to give boosted properties to numerous substrates. It can also be used to give attractive coatings to handles. Handles used in production, often do not have the required strength, durability or resistance to external factors needed for its application. To permit the handle to be used, a coating or finish is used so that the metal’s properties are transformed to give a better performance.
The dying processes are used to give the following improvements:
- Improved appearance
- Improved adhesion
- Greater solderability
- Resistance to corrosion, chemicals, wear, extreme temperatures and tarnish
- Hardness
- Durability
- Electrical conductivity
- Removing of surface flaws and burrs
- Control of surface friction
Chapter7.7: QC Inspection

Quality control is the most important part of production process. It covers many facets of manufacturing including materials used in production, conformance to plans and stipulations and workmanship. The inspector must be knowledgeable about the contractor’s proficiency and the skill set, especially if the inspector has no experience working with the contractor. In such a scenario, certain key adjustments must be made in the review of the manufacturing process. Some general guidelines on project inspection are:
- If the inspector is incompetent to resolve certain situations or disagreements at the site, the inspector must make the decision of whether to call the Engineer to solve the issue or not. It is significant that the examination crew establish an effective working relationship with contractor’s staffs.
- The first step in accomplishing a good rapport with the contractor is to create effective lines of communication between the examination crew and the contractor’s team. This will lessen miscommunication at the industrial site between the two parties.
- It is vital for the inspector to know that the contractor is a partner in a production project and that it is rational to expect them to make a decent return on their venture in the business. Therefore, the assessor must make every effort to resolve queries or issues that arise in a timely manner, so that the contractor can make acceptable progress.
The raw material must be of appropriate composition for the forging procedure, as recognized by the American Society for Testing and Materials. Numerous process parameters through the production process are supervised and controlled to safeguard the final product meets quality standards. The final doorknob is scrutinized for dimensions, surface finish, and other properties. Few of these properties may have to follow to certain building codes.
Subsequently, forgings are designed to estimate final part shape, little waste is done in comparison to other procedures. The forging method also results in consistency in composition, dimensions, and structure from piece to piece, which also reduces rejections.
Chapter7.8: Package
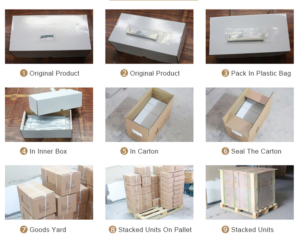
When packing handles, it is vital to make sure the parts and packaging elements are free of impurities, that they have a preservative like a desiccant, are covered and cushioned to prevent mechanical damage, are compartmentalized to lessen and moderate shock and vibration, and are not bulk packaged.
Surface Treatment of Handles
Handles have established a prime coat at the factory. After production, they should be treated with an appropriate top coat. Review the surface finish at steady intervals, and at least once a year check that the surface has not deteriorated and stays water repellant. Preservation intervals are guiding only, and the toughness of the surface finish depends on how visible the units are to sun and wind. South and west facing fronts are especially exposed. A rule-of-thumb: surface treatment is adequate when “droplets” of water form on the wood exterior.
A surface treatment of knobs is constructed right on a base course for the following purposes.
- Wearing surface
- Interlayer
A surface action used as a pavement tiring surface has to have the following characteristics.
- Sufficiently strong to survive traffic and climate-induced stresses.
- Adequately durable to provide satisfactory service life for the planned duration.
- It must seal the roadway base and foundation.
An exterior treatment constructed on base does not add noteworthy strength to the pavement structure. Thus, all the structural strength in such a pavement is given by the base course, which makes its part in the pavement very vital. Such a pavement construction may not be suitable for use in roadways with high traffic volume mainly because the base and subbase coats may not withstand traffic loads. Rock and asphalt may tear off, exposing the base or if a hole exists, water will go directly onto the base.
When a surface action is constructed on base to be used as an under seal (or interlayer), it is sheltered by another structural layer, naturally hot mix asphalt concrete (HMAC).
A surface treatment under seal has several functions in a street.
- It is a very operative method to seal the base, subbase and subgrade sheets from moisture.
- It can act as a temporary wearing surface until it is sheltered with a long-term surfacing layer such as HMAC.
- It can offer a strong bond between the base and the covering layer that will meaningfully decrease the stress levels in the surface layer ensuing in a longer fatigue life of that layer.
- A supple underseal can also act as a Stress Absorbing Membrane Interlayer (SAMI) that can decrease reflective cracking in the HMAC layer. Scorching rubber asphalt surface treatments have shown more efficiency as a SAMI.
- Since the underseals are ultimately covered with HMAC, they can be used in asphalts with high traffic levels.
Product textures which are hand relieved may differ in luster, hue, and appearance because of handcrafted variances in the final concluding step. Product textures which are HAND RELIEVED (Satin Brass & Black 050, Satin Brass & Brown 060, Venetian Bronze 112, Antique Nickel 151, Distressed Venetian Bronze 412, Distressed Antique Nickel 452) may differ in luster, hue, and appearance as an effect of handcrafted variances in the final step.
Chapter8.1: Polished
The polished finish of levers and Its flexibility allows it to merge into nearly any decoration without being unnoticed. Polishing was stimulated by the timeless superiority of the Victorian Era. It is made from dense nickel and can change its color and look for a simple change of lighting.
Polishing knobs is a great way to freshen up a home. Brass inclines to tarnish and change colors as it gets old. To restore it, owners must clean the levers and then polish them. Sometimes this involves eliminating the protective varnish that may exist. The whole procedure is candid and easy to finish. Shoppers need to govern what kind of brass door knobs they have and then tail some simple commands to restore their earlier shine. In fact, most individuals can complete the project by using meek materials available at home.
As a rule, never jump into refining with the heaviest polish you can find. Whether it’s simply your door knobs or any other handle, overpolishing can lead to early clear coat corrosion (you can try using an orbital buffer or polishing by hand with a sponge applicator).
To polish the knobs and the areas underneath, behind, and around them, pour a splotch of a flattening hand polish on a foam applicator and smear. Use a circular motion to guarantee complete coverage. Some areas may require more attention, so repeat if needed.
If you abandon your paintwork and let it be the way it is, it can get to the level where you will need a machine to clean around the knobs. In this situation, you can try an orbital buffer and not a high-speed machine. You will still need to do some refining by hand to get behind the handle and in fitted spots.
Washing, polishing and restoring brass handles can add life to your handles. How you take the project is contingent on the kind of brass you have, how badly stained or degraded it is, and whether it is hard or plated. Brass is an amalgam of copper and zinc, with tin or aluminum added to some kinds of corrosion and tarnish protection. Cleaning and polishing brass knobs is an excellent DIY project, but re-plating is best left to expert restorers.
Step 1
Use a rationally strong magnet to govern whether your holders are solid or plated brass. A magnet is attracted to metal, like steel or zinc, beneath plating but will not pole to brass alloys.
Step 2
Remove varnish if the brass has been squirted with a protective finish. Denatured alcohol, paint stripper or even nail polish remover are likely choices. Use as frugally as possible.
Step 3
Scrub the handle to remove the surface layer of built-up filth, corrosion and tarnish. Use a polish thinner or a mixture of vinegar and salt, scrub with 0000 steel wool (the finest accessible) on solid brass but very cautiously on coated surfaces. An old soft t-shirt is a better excellent for thin, brass-plated surfaces.
Step 4
Soak deeply tarnished brass with ammonia. Ammonia is corrosive and can pit or damage brass if you leave it on too long so observe the chemical reaction carefully. Defuse with a spray of diluted vinegar to stop the procedure.
Step 5
Smear a thin layer of commercial brass cleaner or polish and let to dry. Cleaners or refinements come in both caustic and acidic formulas and you may have to test with what works best for your condition. Generally, acidic formulas respond just with the tarnished brass while caustic ones respond with the brass itself.
Step 6
Buff with a soft cloth to eliminate all polish and repeat procedure until the brass shines and all the tarnish is detached.
Step 7
Send critically tarnished, degraded or eroded brass plate to a door hardware restorer and re-plated in the market. These companies have rough blasters, polishing wheels and compounds, and re-plating gear.
Chapter8.2: Brushed
A modern handle in the brushed normal stainless-steel finish will let you generate your own modern style on a wide variability of kitchen units, writing desks, bathroom cabinets, wardrobe doors and in the office.
The brushed nickel knobs are silvery white with a slight grey tinge in the color. A contemporary cabinet bow handle, and yet can be used in a blend of traditional furniture for a more modern outlook.
Chapter8.3: Sand Blasting
Sandblasting is a very helpful industrial technique. In the present time, this blasting technique goes past its industrial origin and you can find it in many diverse applications. In fact, it is very typical to use sandblasting gear to finish wooden pieces as handles in houses.
Sandblasting is the method of shaping, cleaning and flattening surfaces, particularly the hard ones, by blasting solid atoms across that surface at high speeds; the result is like that of using sandpaper but delivers a more even and a better finish. Besides, it is very rare to have problems at bends or crannies.
This procedure is applied to finish wooden pieces that had been formerly painted and now that painting is totally useless or decided to alternate that painting. House renovation handles use extensively the sandblasting method for this kind of purpose.
Another benefit of using a sandblaster to prep your handles for dust coating is it gives the handle a surface outline or “tooth”. Think of sanding a part of metal with sandpaper and you see the numerous of little scrapes that it leaves. These scratches make high and low points on the metal. This is known as a profile. A profile lets the powder coat to dribble into these high and low points which let it follow the part much better than if the metal was totally smooth. While sand does give your item profile, the sanding spots are in straight lines, a sandblaster makes a uniform textured finish all over the whole surface of your part, and in areas that no sandpaper can range. Without an external profile, powder coating can just crust off the surface, this is known as delamination.
A sandblaster is typically gun shaped and it customs high-pressure air to propel sand or further media. When this medium hits the metal, it can blow off rust, scale, dirt, paint, or other varnishes giving you a clean bare metal exterior. This sandblasting gun can be positioned inside of a sealed cabinet to hold all your media and allow you to salvage it. This dresser is called a blast cabinet. There are also free-standing sandblasting guns that can be used easily, but with these, you must wear some shielding gear.
Chapter8.4: Matt
Matt chrome is like the polished chrome which has been detached from its mirrors like shiny appearance for a multipurpose cabinet handle fit for home and workplace. There is an extensive range of matt nickel cabinet bow knobs to select from. They are silvery white with a slight grey tint in the color. They are very modern in design, and yet can be used in mixture with traditional furniture for a more modern appeal.
The matte finish is outstanding, versatile appearance bridges old and modern styles. Matte has never been chicer—catering to a contemporary look that takes style indications from Bauhaus homes, wrought iron railings and fixtures made by blacksmiths in the Colonial Era.
The brass qualities in the Matte Brass and Black finish are extended with black accents and covered with a matte lacquer, creating a multi-dimensional visual. Hand-relieved finish may differ in luster, hue, and appearance as an outcome of handcrafted alterations in the final finishing step.
Chapter8.5: Chrome Plated
Chrome plating or chromium plating often mentioned as chrome is a technique of coating a thin layer of chromium onto a metal item. The chromed layer can be ornamental, provide corrosion resistance, easy cleaning procedures, or increase surface rigidity. Sometimes, a less expensive clone of chrome may be used for visual purposes.
Chrome plating a component normally includes these stages:
- Degreasing to emit heavy soiling
- Manual cleaning to eliminate all residual traces of dirt and surface filths
- Numerous pretreatments depending on the substrate
- Assignment into the chrome plating vat, where it is permitted to warm to solution temperature
- Application of plating current for the essential time to achieve the desired thickness
There are many disparities to this process, contingent on the type of substrate being coated. Different substrates require different etching chemicals, such as hydrochloric, hydrofluoric, and sulfuric acids. Ferric chloride is also general for the etching of mnemonic alloys. Sometimes the component arrives the chrome plating container while electrically live. Occasionally the component has a compatible anode made from lead/tin or platinized titanium. An emblematic hard chrome vat plates at about 1 mil (25 μm) per hour.
Numerous finishing and buffing methods are used in preparing components for enhancing chrome plating. The chrome coating chemicals are very poisonous. Discarding of chemicals is controlled in most countries. Some common industry conditions governing the chrome plating procedures are AMS 2460, AMS 2406, and MIL-STD-1501.
In layman terms, electroplating is attained by passing an electric current among two electrodes which are absorbed in an electrolyte bath containing chromic acid. One of the conductors will be the substrate which is to be coated. During the stream of electricity between the two electrodes, chromium atoms are placed in a layer on the electrode to be plated.
There are fundamentally two types of plating procedures for chrome:
- Hexavalent chromium. This is the most lethal form of chromium and is a known human carcinogen. Poisonous waste formed by the hexavalent chromium bath is a dangerous waste material and must be dealt with prior to disposal.
- Trivalent chromium. This has a less toxicity than hexavalent chromium. However, its use and removal of any waste material are also firmly controlled.
Bright Chrome texture is mirror-like and is best for a modern or retro setting. Bright Chrome begins in the Art Deco movement and the showy style of the thriving 20s, but can flawlessly transition into the simple approach of the 1930s and 40s as well. It seldom scratches, fades or deteriorates.
Satin Chrome finish, its delicate luster is edgy and appealing, but never lavish. Satin Chrome has a soberly contemporary look and feels that takes its roots from the Bauhaus style crusade. Measured to be a highly acquiescent finish, it is frequently used in commercial applications.
Chrome plating, or electroplating, has numerous advantages. It can survive extreme weather and temperatures and will not rust or oxidize. It is easy to be taken care of and has a glossy finish. People can refurbish their dented chrome-plated parts, saving them the expenditure of having to buy new parts. When a part is unvarnished and then chrome plated, it will be the same as new. Electroplating handles can be used in household, including bathroom and kitchen.
There are some drawbacks to electroplating chrome onto the surface of an item. People must dispatch their parts to companies that are expert in electroplating. The compounds that are used in the chrome-plating procedure are very toxic, so their use is severely regulated by the government. It takes suggestively more time than does spray-on chrome and can be very expensive. Because the portions must be dipped in containers for the chroming process, people are also restricted by the size of the part that they wish to chrome.
The Drawbacks of Chrome Plating include the following:
- Non-uniform coating
- Hexavalent Chromium is a risky air pollutant
- Measuring surface tension is dull and suffers from imprecision
- Corrosion resistance of denser coatings is not quite as good
- Expense of the chemicals is great
- Chrome plating procedure is hard to control
Chapter8.6: Nickel Plated
The use of nickel is very famous for finishing handles, thanks to its bright shine and durable properties. It can be used in products and components in two ways:
- Nickel electroplating is the process of smearing a thin coat on to a substrate (metal or composites such as copper, chrome, tin, silver, gold, zinc, iron and brass) by flowing an electrical current in an electrolytic solution in which the substrate is absorbed. During this procedure, the nickel ions in the solution are left on to the substrate with a thin coating.
Nickel has many benefits when used to plate a variability of products, including improved conductivity, better solderability, rust protection, and wear resistance. It is sometimes also used for decorative purposes as it gives a high-luster finish. It is usually used in handles.
- Electroless nickel plating is a technique of applying one or more coats of nickel to a substrate without consuming an external electrical charge. A major advantage of this process is that it gives an entirely uniform deposit on the substrate – even on the most complex of shapes.
There are two main forms of metallic nickel. There are the brushed nickel and matte nickel texture on cabinet handles or knobs. Both are silvery white with a trivial grey tinge in the color.
The matt and brushed nickel surfaces are very sleek and modern, and yet can also be used in mixture with traditional furniture for some more modern visuals. They look stunning in kitchen units, bedroom furniture or the bathroom cabinet.
Distress Nickel finish is surfaced and full of character. Its antique, rural look is exceptional to each piece. Distressed Nickel has a rustic feel that is evocative of the Old World; today, the texture is growing progressively popular and can be seen in town lofts in cities across the globe.
Satin Nickel surface has the brushed silver hues that flatter and match any décor style. Satin Nickel saw its increase in popularity with the Victorian and Mid-Century Modern design movements. It favors living among bold, geometric shapes and patterns, bright dense colors and edgy, eccentric furniture.
Nickel coated brass with the Baldwin Lifetime Finish generates a surface highly resistant to the conditions of weather and usual wear and tear. High gloss nickel finish, is beautiful for your home. Nickel plating is corroded and then lacquered to symbolize a look of treasured ancient times. Hand-relieved texture may vary in luster, hue, and appearance as an outcome of handcrafted alterations in the final finishing step.
Chapter8.7: Oxidized black
Black oxide or blackening is a change coating for ferrous materials, stainless steel, copper, and copper constructed alloys, zinc, processed metals, and silver solder. It is applied as a mild corrosion resistance, for surface and to lessen light reflection. To attain maximal corrosion struggle, the black oxide must be saturated with oil or wax. One of its rewards over other coatings is its nominal buildup.
Hot saunas of sodium hydroxide, nitrates, and nitrites at 141 °C (286 °F) are used to alter the exterior of the material into magnetite (Fe3O4). Water must be occasionally added to the bath, with proper controls to avert a steam explosion.
Hot blackening comprises of dipping the part into numerous tanks. The workpiece is typically “dipped” by mechanical part carriers for transportation between chambers. These chambers hold, in order, alkaline cleaner, water, caustic soda at 140.5 °C (the blackening composite), and lastly the sealant, which is generally oil. The caustic soda bonds chemically to the exterior of the metal, generating a porous base layer on the part. Oil is then used on the heated part, which covers it by “sinking” into the applied porous sheet. It is the oil that averts the rust of the workpiece. There are many benefits of blackening, mainly:
- Blackening can be done in large groups (ideal for small parts),
- No important dimensional impact (the blacking process generates a layer about a micrometer thick),
- It is far inexpensive than similar rust protection systems, such as paint and electroplating.
Just like a hot black oxide, mid-temperature black oxide renovates the surface of the metal to magnetite (Fe3O4). Still, mid-temperature black oxide blackens at a temperature of 220–245 °F (104–118 °C), suggestively less than hot black oxide. This is beneficial because it is beneath the solution’s boiling point, meaning there are no corrosive fumes produced.
The cold black oxide is used at room temperature. It is not an oxide conversion varnish, but relatively a deposited copper selenium compound. Cold black oxide bids higher productivity and is suitable for in-house blackening. This glaze produces a like color to the one the oxide conversion does but inclines to rub off easily and offers less scrape resistance.
The oxidized pure silver handle is made of sterling silver that has been bare to oxygen in an under-pressure environment for an extended period. It is dissimilar from traditional silver because it is a darker color and has very little shine. The effect of oxidizing pieces is for a somewhat tarnished or antique knob look. This happens when the sterling silver knob is purposely visible to air that contains Sulphur. This compound, silver sulfide, makes blacked patches, which gives the silver a dark black finish, ensuing in pieces that have more of an old-fashioned look.
Pure silver must normally be polished and cleaned on a steady basis to keep it from becoming stained. It should not be sited in areas where it will be bare to large quantities of oxygen and should be taken care of in special silver storage vessels. The oxidized sterling silver knob will not be impacted by the tarnish and the tarnish will permit the oxidized sterling silver knob to take on a more oxidized work.
The oxidized sterling silver lever does not need to be polished or cleaned and is open to any type of environment.
Silver sulfide can be emitted from oxidized sterling silver handle effortlessly, giving the metal back its luster. Rough polishes remove silver-sulfide buildup, restoring luster; some melt the substance but also band away some of the valuable metal. Other polishes converse the original chemical reaction, turning the silver sulfide back into regular, shiny silver.
All metals respond differently, iron and steel will oxidize to a red corrosion or go black, zinc and aluminum will transform into a white powder and silver will turn black.
Oxidizing cannot be accomplished on satin chrome or bright chrome because trivalent chrome and hexavalent chrome is a corroded film and the oxidizing procedure will not be successful, but satin nickel, bright nickel, copper or brass plating can be used.
Chapter8.8: Gold Plated
Gold plating is a procedure in which a thin layer of gold is deposited onto the surface of another metal, most regularly copper or silver (to make silver-gilt), by electroplating.
There are numerous types of gold plating used in the electronics industry:
- Soft, untainted gold plating is used in the semiconductor industry. The gold coating is easily fused, and wire attached. Its handles hardness ranges between 60-85. The gilding baths must be kept free of contamination.
- Bright hard gold, with the handle of hardness between 120-300 and purity of 99.7-99.9% gold. Often holds a small quantity of nickel and/or cobalt; these elements hinder when dying to bond, therefore the electroplating baths cannot be used for semiconductors.
- Bright solid gold on printed circuit board tabs is placed using the lower density of gold in the baths. Normally contains nickel and/or cobalt as well. Power connectors are often made by controlled-depth absorption of only the edge of the boards.
- Soft, pure gold is put on special electrolytes. Complete printed circuit boards can be electroplated. This method can be used for putting layers suitable for wire bonding.
Gold plating of silver is also used in the production of handles. Like copper, silver atoms diffuse into the gold layer, triggering slow gradual fading of its color and ultimately causing tarnishing of the exterior. This method may take months and even years, conditional on the thickness of the gold layer. A wall metal layer is used to counter this outcome. Copper, which also drifts into gold, do so more sluggishly than silver. The copper is typically further plated with nickel. A gold-plated silver article is generally a silver substrate with layers of copper, nickel, and gold left on top of it.
Gold-plating is a technique of covering another type of knob with a very thin, nearly microscopic, film of pure gold by coating it. Some businesses may also mention gold-plated handles as gold-overlay; however, these are basically the same things.
Among the biggest benefits of gold-plated objects is the fact they are strong. Gold is a soft metal, and it is effortlessly susceptible to nicks, dents, and winding. Gold-plating can give a striking finish to a piece that must be robust and durable. The problem is that the gold finish on gold-plated knobs can begin to chip and erode over time. Furthermore, some handles may be prone to tarnishing.
The gold-plated handle is very luxurious and looks just like real gold. The item will be very strong and tough in most cases as the gold will be coated with a stronger metal. This type of knob can also tarnish, damage and flake away.
Chapter8.9: Silver Plated
Silver plating is the process of bonding an enormously thin layer (measured in microns) of Silver to a base metal; most usually used are copper, brass, white metal, or nickel. This coating of silver is so thin and almost impossible to recover from the piece without expensive means and is not worth the cost of salvage due to the small quantity of silver that can be gained. Silver plated flatware and hollowware are very typical, and very low-cost, with the exclusion of rare or limited production items, and objects made by well-known and esteemed manufacturers.
If your handle has EP, EPNS, Silver on Copper, or other words engraved on it, then it is electroplated silver, it is not genuine. EPNS is an abbreviation of electroplated nickel silver. Manufacturers are not permitted to use the word “Sterling” on coated items, so you will never see words “Sterling Plated”. However, some dodgy sellers, particularly on Television ads, will use the phrase “Layered in Precious Sterling Silver”. This is an advertising trick used to get you to buy their merchandise, thinking it is Sterling Silver.
The primary form of silver plating was Sheffield Plate, where thin slips of silver are merged to a layer or coat of base metal, but in the 19th century, new systems of production (including electroplating) were presented. Britannia metal is a blend of tin, antimony, and copper established as a base metal for plating with silver.
Care should be given to parts exposed to high moisture environments because in such environments, when the silver layer is spongy or contains cracks, the basic copper undergoes quick galvanic corrosion, peeling off the plating and revealing the copper itself; a procedure known as red plague. Silver plated copper preserved in a moisture-free environment will not suffer this type of corrosion.
Cleaning silver plated knob is the best way to keep your treasured knobs looking shiny and new. However, the proper approaches to use aren’t always clear, and if you own silver-plated handles, you may be going about it the incorrect way.
Most of the muddle you may be having in your mind comes from the fact that some polishing methods used on the solid silver handle, can mutilate silver plated items, which have only a tiny layer of silver electroplated over another metal.
The simple way to tarnish off your silver-plated handles is to wash them with warm water. The biggest advantage of this method is how mild it is. If you’re sure to use warm water explicitly, and not hot water, there’s a little hazard of accidentally getting rid of any of the lacquered finish on your silver along with the stain.
This method works best for light cleaning or the elimination of minimal tarnish. So, if you have a silver plated knob that has been used lately, this is the possibility you should try first for proper cleaning.
Electrolysis is a less damaging way to go. Instead of eliminating the black silver sulfide tarnish, electrolysis converses the chemical reaction, leaving the silver undamaged.
One mistake to evade with silver plated objects is using abrasives. Abrasives cleaners are severer in terms of their capacity to scour off tarnish, but because of this strength, they can easily liftoff some of the silver platings too. They are more usually used when cleaning solid silver, and even then there is a danger of damage if used incorrectly.
Chapter8.10: Antique brass Plated
Apart from gold, copper & silver another important metal used for electroplating is brass. brass electroplating is used for the creation of brass sculptures. brass electro formation refers to a metal forming process which is formed in thin parts through the electroplating process & is produced as a result of plating a metal skin onto a base form. This is known as a mandrel. Brass electroforming process which produces plating, much thicker and can sustain itself even if the mandrel is removed.
Conventional cyanide plating process:
- It plates twice as fast as any other cyanide brass process]
- It is a single additive process with excellent throwing power that produces a lustrous, highly desirable yellow-green, 70/30 brass color
- It is a low-temperature process operating at 105° F and can be used in both rack and barrel operations
- The copper and zinc plate together in a uniform alloy composition over a wider current density and temperature range, thereby helping to reduce rejects due to poor color, non-uniformity, and poorly oxidized finishes
- The E-Brite B-150 utilizes electrosolv as an anode corridor which retards the growth of carbonates, plus in barrel brass lines utilizing electrosolv will eliminate the need for addition of copper and zinc cyanide when using 70/30 brass anodes
Antiques are frequently passed down through generations and become cherished items in the home. Unfortunately, many antiques are bound to have scratches or loose paint throughout years of wear and tear. Brass plating is a perfect way restore antiques and add a protective layer. Expert provides polishing, lacquering, and brass plating of antique handles.
The Antique Brass finish has rich brown hues and golden undertones in a warm, welcoming appearance. The Antique Brass finish closely resembles the look of natural brass and is undeniably Victorian, with hints of Colonial Era style occasionally peeking through.
Chapter8.11: Antique copper-Plated
In addition to Gold, the other mostly used metal is Copper which is used for putting the properties of copper or other metal surfaces. The method is done in an electrolytic solution with a copper ribbon acting as a cathode and the metal to be electroplated as an anode. Copper metals are slowly left on the surface of the other metal and hence attains the properties of the copper metal. These are also shifted to that metal surface.
Benefits of Copper Plating are:
- Outstanding Adhesion
- Formulated for zinc die cast
- Large operating window
- One preservation agent
- For rack and barrel
- No carbonates
- cheaper than other plating processes
- Fire departments prefer non-cyanide metal finishing shops
- Insurance companies prefer non-cyanide
- Homeland Security Chemical Security Appendix A list sodium and potassium cyanide limit as 2000 pounds
- Save money on excess treatment costs
The antique finishes are mostly for decorative purposes only and it is not prudent for external environments except if a heavy coating of lacquer is used which can change the aesthetics. Copper and brass are finest for antiquing because there is a wide distinction of blues, greens, and bronzes.
Test of Handles
The Standard holds requirements for cabinet handles which includes hinges, knobs, pulls, catches, shelf rests, standards and brackets, drawer slides, revolving shelves and track with guidelines for sliding panels. Encompassed are performance tests covering functioning, cyclical, strength, and finish criteria.
Tests defined are performed under laboratory conditions. In real usage, results differ because of installation, maintenance, and environmental settings. Required test is applicable to hardware products only and are not planned to evaluate systems incorporating cupboard components. Fixtures designated are designed to withstand the test forces and only handles are measured.
Grade credentials Manufacturers shall specify the grade level of their products. Cabinet holder should meet all tests for the grade listing. 3 grades are presented for most products; for drawer slides, further grades 1HD are available.
Chapter9.1: Raw Material Inspection of Handles
A great way to cope with defective handles is to catch quality problems early before they make their way into the final products. Recognizing issues before shipping helps you evade making expectations about product quality—expectations that can cause supply chain troubles and cost you money if you find a substantial portion of the goods you obtain is unsellable. There are diverse stages during the production process where examination can be performed to show you the current state of your order.
Performing examinations of raw materials and gears before production begins can possibly reveal pressing quality problems. Manufacturing handles and wants to hold your dealer to certain values when it comes to selecting a quality metal hide for manufacture. One of the best ways to do this is by checking the arriving raw materials before the factory begins production.
Without this added mistake, you might find out months later that mediocre materials were used and be required to either:
- Take the handles as they are, even though they don’t meet the potentials of you and your customers, or
- Start over by producing an entirely new order (and possibly need to find a new supplier)
Historically, research and development functioned alone when choosing a new raw material. Presently, a broad team of expertise is required, due to increased admission to unique and complex materials, global sourcing, handling approaches, customer locations, and protocols. The team evaluates if the material has limitations or may be too expensive to handle, and controls if additional measures are essential to prevent potential security issues for the employees and product.
R&D selects the suitable raw materials based on functionality. Functionality can include multiple areas, such as giving identified characteristics of the finished product (folders, thickeners, type of balm for plastic packaging, etc.), organoleptic features (flavor, color, aroma, texture), product care characteristics (to lower the pH or water activity), and stabilizers (long shelf life, color, or flavor retention, etc.).
Raw material examinations are a vital step in that procedure, helping to safeguard that your supplier is meeting your conditions and giving your vision into the flora of your raw materials’:
- Identity
- Safety
- Suitability for your product
Eventually, the aim is to give sureness that you are creating a safe, high-quality product that meets the prospects of customers and regulatory bodies.
Chapter9.2: Salt spray test on Handles
The salt spray (or salt fog) test is a consistent and popular deterioration test method, used to inspect strength against corrosion of materials and surface layers. Typically, the materials to be tested are metal (although stone, ceramics, and polymers may also be confirmed) and finished with a surface layer which is planned to provide a degree of corrosion guard to the primary metal. Salt spray testing is an augmented corrosion test that harvests a corrosive attack on coated models to evaluate (mostly reasonably) the suitability of the layer for use as a protective finish.
The feel of corrosion products (rust or other oxides) is assessed after a pre-determined period. Test interval depends on the corrosion resistance of the varnish; generally, the more rust resistant the coating is, the extended the period of testing before the presence of corrosion/ rust. The salt spray test is one of the most general and long-established corrosion tests. ASTM B117 was the first internationally documented salt spray standard, originally issued in 1939. Other significant relevant standards are ISO9227, JIS Z 2371 and ASTM G85.
The reason why salt spray testing is popular can be because it is relatively inexpensive, quick, well homogenous, and reasonably repeatable. Though there may be a weak association between the period in salt spray test and the expected life of a covering in certain coatings such as hot-dip spurred steel, this test has gained worldwide approval due to low cost and quick consequences. Most Salt Spray Spaces today are being used not to forecast the corrosion resistance of a glaze, but to maintain coating progressions such as pre-treatment and painting, electroplating, electrifying, and the like, on a relative basis.
Typical coatings that can be assessed with this method are:
- Phosphate (pre-treated) exteriors (with subsequent paint/primer/lacquer/rust preventive)
- Zinc and zinc-alloy electroplating
- Electroplated chromium, nickel, copper, tin
- Layers not applied electrolytically, such as zinc flake coatings rendering to ISO 10683
- Organic coatings, such as rust protection
- Paint Coating
A typical salt-spray compartment has some basic gears: an air saturation tower that alleviates the salt concentration, a tank for the solution itself, an atomization spout for the creation of the fog, secondary mechanisms to hold the parts, a technique for distributing heat inside the chamber and a temperature regulator.
If you have regulation over the way your parts are mass-produced, you can do a lot to guarantee the plating process runs effortlessly and the coatings will be very corrosion resistant.
Chapter9.3: Tensile test
Tensile testing, also known as pressure testing, is an essential material science and engineering assessment in which a sample is exposed to a controlled tension until catastrophe. Properties that are measured via a tensile test are a final tensile strength, breaking strength, determined elongation, and reduction in area. From these dimensions, the following properties can also be resolute: Young’s modulus, Poisson’s ratio, yield strength, and strain-hardening features. Uniaxial tensile testing is normally the most used for gaining the mechanical characteristics of isotropic materials. Some constituents use biaxial tensile testing.
There many different alternatives of tensile tests but a few of the typical tests are:
- tension,
- tensile adhesion,
- tensile shear,
- tensile grab,
- tensile pulling,
- tension fatigue, and
- tensile creep.
In most of these tests, the sample is loaded until it fails or breaks with the main alteration in the type of specimen geometry and related tensile test fixture used. Tension fatigue testing varies not only in the type of hold but also in the test of the machine. It is done by loading the material to a positive force and then dipping the load to zero and reiterating this process until the model fails with the number of cycles till letdown as the desired value to be calculated. Tensile creep is like this excluding that the load is not altered but rather steadily pragmatic until the sample fails.
Tensile testing might have a variability of purposes, such as:
- Select a material for an application
- Forecast how a material will act when in use: normal and extreme forces.
- Determine if, or validate that, the requirements of a specification, regulation are met
- Elect if a new product development program is on track: Validate proof of concept
- Demonstrate the efficacy of a proposed patent
- Provide normal data for other scientific, engineering, and quality declaration functions
- Provide a foundation for Technical communication
- Provide a technical means of evaluation through several options
- Provide proof in legal proceedings
Approximately all materials can be tested in tension in one way or another, but the more popular materials contain metals, plastics, woods, polymers, and textiles. The test model often takes the forms of bars, strings, strands, coupons, dog bones, and dumbbells contingent upon the material, the ductile grip, and test performed on the example. Materials with high compressive strength standards have relatively low tensile strength, such as block and aerospace fusions. These are not generally tested in pressure as their applications do not normally involve them to withstand tensile loads.
Common tensile testing outcomes include:
– Maximum Load
– Deflection of Maximum Load
– Work at Maximum Load
– Stiffness
– Load at Break
– Deflection at Break
– Work at Break
– Chord Slope
– Stress
– Strain
– Young’s Modulus
Handles Brand
When buying handles, we should always focus on well-known brands for quality and services. When we talk about the famous door handles brands we are not telling you about the brands that you should rely on. In fact, these are the brands that people have already relied on. The consumers have placed their trust in the hands of the right companies. These companies have diverse handle models with different aptitudes. Each handle will offer different strengths and weaknesses which may sometimes not align with the brand’s overall track record.
- Kwikset
- Schlage
- Baldwin
- Yale
- Corbin Russwin
- Mul-T-Lock
- RR Brink
- Medeco
- Evva
- ASSA-Abloy
What you use to secure your door should not be based on the brands that people trust the most. Security is not a popularity contest. Make sure that you choose the brand that fits your needs. As we have seen, almost half of the most trusted brands are manufactured by one company. For the best security, I would suggest completing a risk assessment for the property.
A huge selection of the best door handles brands in the industry today are as follows:
- Advantage
- Allison
- Amba
- Amerock
- Atlas Homewares
- Beslagsboden
- Berenson Hardware
- Blum
- Bommer
- Brass Accents
- Bucksnort Lodge
- Cavity Sliders
- Century
- Deltana
- Dexter
- Don-Jo
- Dynasty
- Emtek
- EZSet
- Falcon
- Fusion
- Galleria
- Grandeur
- Grass
- Hager
- Hardware Resources
- Inox
- Ives Hardware
- Knape and Vogt
- K2 Comm. Hardware
- Kwikset
- LCN
- Leatherneck
- Linnea
- Lockey
- LockState
- MaxGrade
- Muscle Car Acc.
- Nostalgic Warehouse
- Nova Hardware
- Omnia
- PHG
- Residential Essentials
- Rusticware
- Safeland Industrial
- Salice
- Schaub
- Schlage
- Smedbo
- Stanley Hardware
- Sure-Loc
- Top Knobs
- Weiser
- Weslock
- Whitehall Products